Feeds:
Posts
Comments

Posts Tagged ‘julia child’

©StephenKolyer_CountryHam


Once again we are moving into that time of year when entertaining and traditional meet hand in hand.  If you have followed my ramblings or have read my most recent cookbook, An American Family Cooks, you know how much a traditional country ham is part of our holiday season.  Our holiday ham of choice is Col. Bill Newsom’s Aged Ham which comes from Newsom’s Old Mill Store in Princeton, Kentucky (www.newsomsham@yahoo.com).  Touted by James Beard and Julia Child when they discovered them in the 1970s, these spectacular hams are now high on the list of many famous cooks.  Col. Newsom was a cousin of my Uncle News so I always consider his daughter Nancy (who now runs the store) to be a kissin’ cousin.    The hams are authentically cured and are sodium nitrate and nitrate free.  You can order free-range, naturally cured or the regular, ambient weather cured.  Whichever you choose, they are the product of treasured tradition.  These hams do take a bit of work to prepare, but I guarantee the end result will thrill.  While ordering your holiday ham be sure to add some bacon and sausage to your list– you won’t believe their smoky goodness.


Newsoms Country Ham_DSC_3377

Read Full Post »

Beef_G10_IMG_0363


Now doesn’t that sound a lot fancier than plain old beef stew or beef in red wine sauce?  Those French sure know how to make a culinary mountain out of a mole hill, don’t they?  However you say it, hunks of beef braised in red wine is one of winter’s most comforting meals.  I have a special method of making my version that helps give it a French-style, deep-dark rich sauce.  I chop a few handfuls of portobello or cremini mushrooms and add them to the braising liquid.  This adds an intense depth of flavor, but it also makes for a sauce with lots of little bits in it so before I add the whole or halved or quartered mushrooms and pearl onions, I strain the sauce so it is perfectly smooth.  We don’t have a photo for the finished dish ‘cause it is just too hard to make it look pretty – a photo of dark sauce and meat just doesn’t look very tasty to me. But, since I love my mushrooms they get a photo all their own.  If you have any interest in the “real” boeuf bourguignon, Julia Child and Simone Beck gave us the real deal in 1961 when it appeared in Mastering the Art of French Cooking.  If you don’t own the book, buy it – no cook should be without it.
The following recipe should feed 6 hungry people.

2 pounds lean beef stew meat, cut into large cubes
About ½ cup all-purpose flour
Salt and pepper
¼ pound piece bacon, slab bacon, guanciale, or other smoky cured pork product
1 medium onion, peeled and chopped
½ pound cremini or portobello mushrooms
2 teaspoons chopped garlic
3 cups dry red wine
3 cups beef stock or nonfat, low-sodium beef broth
1 tablespoon tomato paste
1 sachet (parsley sprigs, 2 bay leaves, 2 thyme sprigs or ½ teaspoon dried thyme tied in a
cheesecloth bag)
1 pound whole small mushrooms or halved or quartered larger ones
2 tablespoons butter
1 tablespoon olive oil
About ½ pound frozen pearl onions, thawed and well-drained
1 tablespoon chopped parsley

Place the meat in a large bowl and sprinkle with flour and salt and pepper.  Toss to coat well.  Set aside.
If necessary, trim and discard the rind from the bacon and cut into cubes.  Place the cubes in a Dutch oven over medium heat and cook, stirring occasionally, for about 10 minutes or until most of the fat has been rendered out and the cubes are just beginning to be crunchy.  Using a slotted spoon, transfer the cooked bacon to a double layer of paper towel to drain.
Shake the excess flour off of the meat and then place the meat into the hot bacon fat.  Sear, turning frequently, until all sides are nicely browned.  You will have to do this in batches.  As browned, transfer to a plate.
Add the chopped onion and mushrooms along with the garlic to the hot pan and cook, stirring frequently, until the mushrooms exude their liquid and the onions begin to color.  Drain off excess fat.
Add the wine, raise the heat, and bring to a boil.  Lower the heat and simmer for about 5 minutes or just until the alcohol begins to burn off.  Add the stock and tomato paste along with the sachet, stirring to blend.  Season with salt and pepper.  Return the meat to the pan, cover, and bring to a simmer.  Lower the heat and cook at a bare simmer for 1 hour or until the meat is just tender.
Remove the pan from the heat and, using tongs, transfer the meat to a plate.  Strain the braising liquid through a fine mesh sieve into a clean bowl.  Wipe out the Dutch oven and return the strained liquid to it, along with the meat.
Add the whole or halved mushrooms and return to medium heat.  Bring to a simmer and cook for another 30 minutes or until the mushrooms are cooked and the meat is very tender.
During this last 30 minutes of braising, place the butter and oil in a large frying pan over medium heat.  When very hot, add the onions, season with salt and pepper, and cook, stirring frequently, for about 5 minutes or until the onions are golden.  Using a slotted spoon, transfer the onions to a double layer of paper towel to drain off excess fat.
Spoon the pearl onions into the braising liquid.  Taste and, if necessary, season with salt and pepper.
Spoon the stew into a large serving bowl and sprinkle with the reserved bacon bits and parsley.  Serve alone with lots of crusty bread to sop up the gravy or with noodles, rice, or mashed potatoes.


Beef

Read Full Post »

20130619_Linda's_sous_vide_07_IMG_0039

 
Our lovely friend, Linda recently invited us to dinner where she was going to demonstrate her skill at cooking sous vide.  We had a glorious meal so I asked Linda to tell my blog readers about it.  Here’s her report:
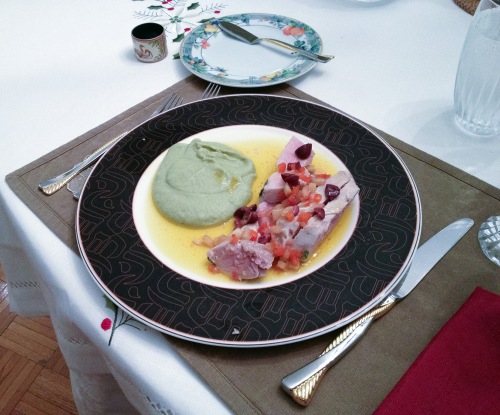
“I am very excited that Judie asked me to take over her blog just this once to write about our shared sous vide experience.  Loosely translated, sous vide means “under vacuum”, and it’s a cooking method that took hold in France in the ‘70’s.  Now this it is used by chefs all over the world.  Since I have sous vide equipment (most of which you really don’t need) my husband and I invited Judie and Steve over for a trial run and fish dinner. The ladies had turbot filets and the gentleman chose yellowfin tuna steaks. One of the great benefits of this method is that you can cook two entirely different types of fish, use the same tub, and end up with terrific results. Everything cooks evenly and the fish retains its flavor.
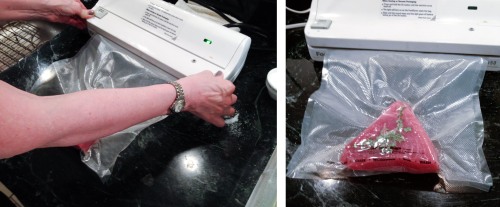
Photos 1 & 2 (Food Saver and tuna in bag)
The only piece of equipment that’s key is a Food Saver type vacuum sealer. I seasoned the fish at the last minute, topped it with some thyme, put it in the plastic bag and vacuum sealed it up tight.
Photos 3, 4 & 5 (Tuna and Turbot side by side pictures, and in water bath)
The difficult part is done and both fishes are ready to be submerged.

I have an emersion circulator that you can set to a tenth of a degree but I guarantee that this is not necessary. You can simply heat up some water in a large stockpot and use a basic kitchen thermometer to gauge the temperature. For both the turbot and the tuna, I went with 58ºC (you’ll note that the temperature decreases a bit when the bags are submerged) or about 138ºF. This is the temperature that you’ll want the fish to be when it’s finished so it can’t be overcooked.
Photo 6 (Tuna in pan)
Both fish stayed in the water bath for about 15 minutes and all that was necessary was cutting open the bag and plating, but since tuna is more like a steak, I wanted a sear. Just a minute on each side in a hot pan did the trick.
Photo 7 (Tuna being sliced)
The tuna turned out moist and perfectly medium rare and we were ready to eat!

The fish was topped with diced cucumbers, olives, red onion and red peppers lightly sautéed with smoky paprika and the side was a puree of fennel.  Everything was easily prepared ahead so the plating and assembly took no time and we were able to enjoy some good wine and Judie and Steve’s wonderful company.”


SV-1


SV-2


sv-3

Read Full Post »

tarte_tatin_DSC_0666

I always like to give my kitchen a few farewells as the hot weather approaches and one of those “farewells” is a last oven turn-on.  So, what better way to say adieu than with a tarte tatin, that quintessentially French winter dessert.  I don’t know why more home cooks don’t make these beautiful and very tasty tarts as making one is easier than making a pie or cake, particularly since it nicely uses frozen puff pastry.  When I made the one in the photo I cut my apples into eighths instead of quarters – don’t know what I was thinking.  Quarters just seem to look better when you turn the tart upside down.  Anyway, here’s how you bring a little bit of France to your dessert table.  I use a nonstick, oven-proof frying pan and recommend that you do, also.

¾ cup sugar – either granulated or light brown, whichever you prefer
¼ cup water
½ cup unsalted butter
4 large tart apples, peeled, cored, and cut into quarters
One block frozen puff pastry, thawed (I’m not sure of the weight – use either Dufour or Trader Joes – they are both made with butter)
Preheat the oven to 375ºF.

Combine the sugar and water in an 8-inch nonstick, oven-proof frying pan over low heat.  Cook, stirring constantly, for about 4 minutes or until the sugar has dissolved.  Raise the heat to medium and bring to a boil.  Allow to cook, without stirring, at a gentle boil for about 8 minutes or until a golden syrup has formed.  Stir in the butter and cook, stirring, until well-blended.
Remove the pan from the heat and carefully arrange the apples, cut side facing up, in a slightly overlapping circle down into the caramel.
Roll the pastry out on a lightly floured surface and then cut it into a circle about 9-inches in diameter.  Place the pastry over the apples and fold the excess edge under to enclose the apples.
Using a paring knife, cut at least 4 slits in the center of the pastry to allow steam to escape.
Place in the preheated oven and bake for about 35 minutes or until the pastry has puffed and is golden brown.
Remove from the oven and place on a wire rack to set for about 5 minutes.  
Using a small, sharp knife, loosen the edges from the pan and then carefully turn the tart out onto a serving plate.
Serve warm with whipped cream, crème fraîche, frozen vanilla or coffee yogurt, or caramel ice cream, if desired.  It is absolutely fine on its own, also.

tarte_tatin_DSC_0669

Read Full Post »