Feeds:
Posts
Comments

Posts Tagged ‘dinner’

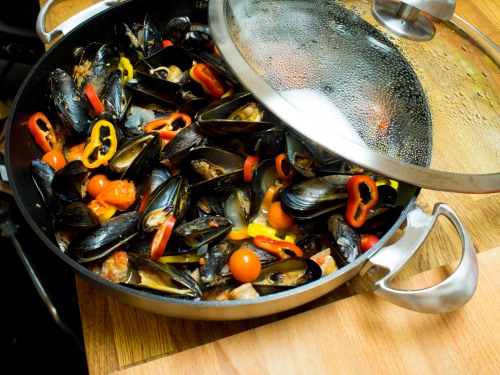
Mussels cooking


Fortunately, our Union Square Green Market isn’t just vegetables and fruits – we have cheeses, meats, poultry, fish, plants, and cut flowers to complete the outdoor shopping experience.  I was looking for some inspiration on Saturday and found some merguez sausage at the Flying Pigs Farm (www.flyingpigsfarm.com) stall.  That purchase led to a couple of pounds of mussels at Seatuck Fish Company (www.seatuckfish.com) and the two of them led to dinner pulled together in my beautiful Scanpan covered chef’s pan.
Here’s how it came about:  I sautéed some onion and garlic in a bit of olive oil until just softened.  I sliced up the sausage and added it to the pan and cooked it until it had lost its color.  Then I added about 1 cup of dry white wine, brought the mix to a boil and then lowered the heat and simmered for about 4 or 5 minutes to evaporate the alcohol.  That was followed with ¾ cup of pureed fresh tomatoes, 1 cup of clam broth, and some basil and chile flakes.  I cooked the liquid for a bit to allow the flavors to blend.  Then I added the scrubbed mussels and covered the pan.  Since the lid is glass I could watch the mussels open so just as they began to open I added a big handful of yellow cherry tomatoes and another handful of sliced baby red, yellow, and orange bell peppers.  Again, I covered and watched the mussels finish popping open.  Voila! A one pot dinner came to the table, 1,2,3!


Mussels plated

Read Full Post »

Meatballs_IMG_0345


March-April must be my meatball month. I just looked at past posts and found that I had talked about meatballs (and spaghetti) on March 11, 2011. Here I am talking about meatballs once again. You can find my recipe in that post, but thought it worth a reminder. Since that March I have been making meatballs in batches and freezing them. Since I always have my marinara sauce on hand (see July 13, 2010 for that recipe) at the end of a long day, I can reach into the freezer and in just a few minutes put together a pot of meatballs in sauce to toss into a bowl of spaghetti. Try it, you’ll like it.

Here are the links to the Meatball and Marinara recipes:

http://notesfromjudieskitchen.com/2011/03/11/who-doesn%E2%80%99t-love-spaghetti-and-meatballs/

http://notesfromjudieskitchen.com/2010/07/13/simple-marinara-sauce/

Read Full Post »

Meatloaf.dinner.IMG_0127
I’ve always loved meatloaf – almost any kind – even that grey diner variety can pique my interest.  It isn’t a family favorite so I don’t make it as often as I would like and when I do I have to doctor it up a bit to bring everyone to table.  This can mean that I look in the fridge to see what needs to be used yesterday and add it to the mix.  The other day that meant a container of cherry tomatoes and a sack of button mushrooms.  However, the thing about meatloaf is that it can be almost anything you want it to be so I will give you my mom’s old fashioned recipe – the one that I grew up on.  But, you can use beef, chicken, turkey, pork, lamb or any combination thereof to create an easy pop in the oven dinner – I always serve mine with baked potatoes and salad so dinner comes to the table 1-2-3.

1 ½ pounds lean ground beef
½ pound ground pork
1 medium onion, minced
½ cup diced canned tomatoes (my mom used those she had canned)
1 teaspoon chopped parsley (mom used dried)
1 teaspoon Worcestershire sauce
1 cup fine breadcrumbs
1 large egg
¼ cup milk
Salt and pepper to taste

Preheat the oven to 350ºF.
Combine the beef and pork in a large mixing bowl.  Stir in the onion, tomatoes, parsley, and Worcestershire.  Add the breadcrumbs along with the egg, milk, and salt and pepper, and,  using your hands, squish to thoroughly combine.
Form the mix into a firm loaf about 4-inches wide by 8-inches long.  When forming it into a loaf, you can also place 3 hard boiled eggs down the interior center.
Now, here’s where you can make some changes.  You can:
Cover the top with strips of bacon.
Make a sauce that can serve as gravy by combining 1½ cups tomato puree with ½ cup beef  broth (or stock if you have it) and ¼ cup minced onion OR 1½ cups beef broth with 2 tablespoons tomato paste, ½ cup chopped mushrooms, and 2 tablespoons minced onion.
Now, mind you, these are mom’s 1940s instructions – you can do whatever you want to fancy it all up.  When I want mom, I mix some broth with catsup and add whatever is on hand to spice it up a bit.  This is old-fashioned home-cooking after all!
Place it in the oven and bake for about 1 hour or until nicely browned and cooked through and, if you’ve made it, a slightly thickened tomatoey gravy has formed.

Meatloaf.dinner.IMG_0132

Read Full Post »

Collard_Greens_DSC_2555

After the last year or so of seeing kale lauded as the second coming, I’ve had it with that crunchy, earthy green and am switching my allegiance to other good-for-you leafy things.  A few nights ago I had a dinner request for fried chicken and whenever I made fried chicken, I always add collard greens to the table.  I sauté some onion and bacon (bacon ‘cause its always on hand, but if I am out and about I will pick up some ham hocks or pork belly to use) and then add the chopped collards.  Once seasoned with some salt and pepper and red chile flakes, I cover the pot and just let them cook away until they are juicy, soft and tummy-warming.  This can take a couple of hours or so.  Then, I add a good dose of vinegar and serve them with cornbread to sop up the “pot likker” and chopped onions to add some heat and texture.  Sooooo, sooooo good!  And, better than kale, for sure.

Read Full Post »

Deena_Sausage_Peppers_DSC_1394


I bought what I call politically correct sausages – organic meat which is to my liking – but somehow organic often translates to not much taste and that is what these sausages were – politically correct, organic and locally made, but lacking in flavor.  Not a bit like those street-wise Italian hot and sweet sausages that give you a monumental hit of garlic and chile when you bite into them.  So, anyhow, I tried to doctor up my sausages – particularly for my “best girl friend on the block”, Deena, who likes heat, both in food and her humor to whom I had promised a sausage mix for a late afternoon sandwich.  I bought some colorful Italian frying peppers from Zingone, my neighborhood market, and sliced them up with some yellow onions and garlic.  Browned the sausages and added the vegetables along with some chile flakes and black pepper.  Fried them just until almost soft, added some chopped basil, and they were ready to go into a nice soft roll.  Still not zesty, but certainly no longer bland.  Deena didn’t say so but I know she  added some hot sauce to hers.

Read Full Post »

20130714_Artichokes_baby_DSC_1092

If you’ve read my posts for awhile you will know that I love artichokes.  The baby ones I got at the farmers market the other Saturday made the best Roman Fritto Misto, but since I only fried the artichokes I guess it was a fritto without the misto. To make the misto, just combine an assortment of vegetables cut into a little bit larger than bite-size pieces. Sounds very fancy, but it is so simple to do.  Here’s how:
Clean the baby artichokes and cut them, lengthwise, into quarters.  Scoop out the fuzzy choke and rinse well.  Rub well with a cut lemon half and pat dry.  (Work quickly as the cut artichokes will rapidly begin to discolor.  You can always put them in acidulated (lots of lemon juice) water as you work to stop the process, but then you really have to make sure they are well-dried before frying.)

Combine the cut artichokes with salted flour in a resealable plastic bag, close, and shake well to coat generously.
Whisk 2 eggs together in a shallow bowl.
Heat olive oil in a deep fat fryer to 375ºF on a candy thermometer.
Place the floured artichokes in a sifter and shake to remove excess flour.  Quickly dip into the beaten egg and immediately drop into the hot oil.
Fry for about 3 minutes or until golden brown and crisp.  If they cook too quickly, remove the fryer from the heat and let the oil cool to 365ºF before continuing to fry.
Lift from the oil and place on a double layer of paper towel to drain. 

Sprinkle with salt and serve hot.

Read Full Post »

20130619_Linda's_sous_vide_07_IMG_0039

 
Our lovely friend, Linda recently invited us to dinner where she was going to demonstrate her skill at cooking sous vide.  We had a glorious meal so I asked Linda to tell my blog readers about it.  Here’s her report:
“I am very excited that Judie asked me to take over her blog just this once to write about our shared sous vide experience.  Loosely translated, sous vide means “under vacuum”, and it’s a cooking method that took hold in France in the ‘70’s.  Now this it is used by chefs all over the world.  Since I have sous vide equipment (most of which you really don’t need) my husband and I invited Judie and Steve over for a trial run and fish dinner. The ladies had turbot filets and the gentleman chose yellowfin tuna steaks. One of the great benefits of this method is that you can cook two entirely different types of fish, use the same tub, and end up with terrific results. Everything cooks evenly and the fish retains its flavor.
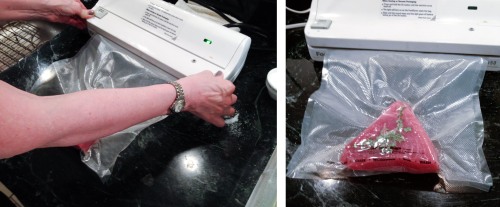
Photos 1 & 2 (Food Saver and tuna in bag)
The only piece of equipment that’s key is a Food Saver type vacuum sealer. I seasoned the fish at the last minute, topped it with some thyme, put it in the plastic bag and vacuum sealed it up tight.
Photos 3, 4 & 5 (Tuna and Turbot side by side pictures, and in water bath)
The difficult part is done and both fishes are ready to be submerged.

I have an emersion circulator that you can set to a tenth of a degree but I guarantee that this is not necessary. You can simply heat up some water in a large stockpot and use a basic kitchen thermometer to gauge the temperature. For both the turbot and the tuna, I went with 58ºC (you’ll note that the temperature decreases a bit when the bags are submerged) or about 138ºF. This is the temperature that you’ll want the fish to be when it’s finished so it can’t be overcooked.
Photo 6 (Tuna in pan)
Both fish stayed in the water bath for about 15 minutes and all that was necessary was cutting open the bag and plating, but since tuna is more like a steak, I wanted a sear. Just a minute on each side in a hot pan did the trick.
Photo 7 (Tuna being sliced)
The tuna turned out moist and perfectly medium rare and we were ready to eat!

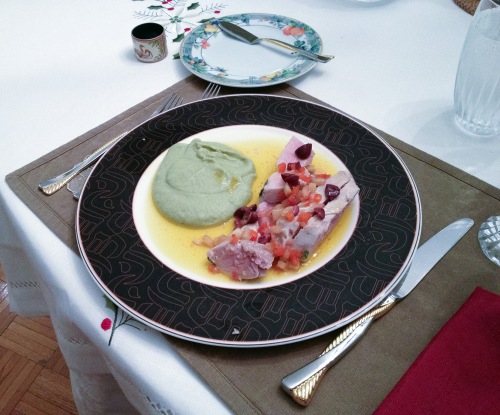
The fish was topped with diced cucumbers, olives, red onion and red peppers lightly sautéed with smoky paprika and the side was a puree of fennel.  Everything was easily prepared ahead so the plating and assembly took no time and we were able to enjoy some good wine and Judie and Steve’s wonderful company.”


SV-1


SV-2


sv-3

Read Full Post »

20130713_Squash_Stew_DSC_0986

Sometimes when I am shopping in the farmers market everything looks so inviting that I can’t decide what to buy.  All of the little summer squashes looked at the peak of perfection which made it impossible to select just one type.  So I decided to buy one of each and put them all together in the pot.  When I got home I sautéed some sweet onion (from a new crop) and garlic in extra virgin olive oil.  When the onion was sweet and soft, I added the sliced summer squash – green, yellow, and a little of both – along with some cherry tomatoes.  I let them simmer for about 15 or 20 minutes or until soft and juicy, but not mushy.  I had a perfect side dish, a toss-in for pasta, and a take along cold lunch all in one.

Read Full Post »

20130702_Corn_DSC_0939

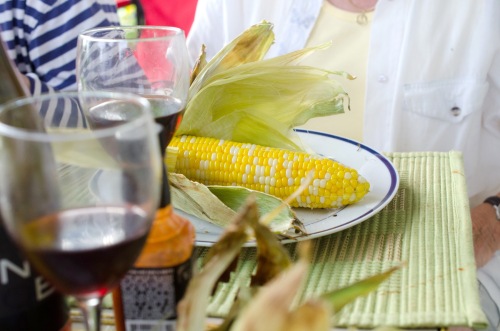
Fresh off the grill – the taste we’ve been waiting for all winter!  If this first batch tells the story, it’s going to be a great summer for corn.

Read Full Post »

BBQ_Ribs_IMG_0463

Come summer everyone seems to have a favorite recipe for barbecuing spareribs.  I have a couple of methods that I think work amazingly well although nothing can beat the classic pit barbecues of the south. And, of course, there is the ongoing argument between vinegar dousing and tomato-based sauces.  I like both so do a change-up from time to time.
Here’s my spice mix which can be used on ribs as well as poultry and other meats.  It makes about 1 cup, but since it keeps for about 3 months it is wise to make the whole amount (or more) to have on hand for spur-of-the-moment ‘cuing.  To use it on ribs, I generously coat the ribs (usually baby back) with the mix, wrap them tightly in heavy duty aluminum foil and place them on the coolest part of a very hot grill (at least 450ºF) and roast them up for about 90 minutes, turning the packet occasionally, or until almost falling-off-the-bone tender.  Don’t put them over direct heat or the outside will quickly burn and the meat will be tough.

10 dried ancho chiles, seeded and stemmed
1 cinnamon stick
2 tablespoons cumin seeds
2 teaspoons coriander seeds
½ teaspoon whole cloves
2 tablespoons light brown sugar
1 tablespoon coarse salt or to taste
1 teaspoon ground black pepper
½ teaspoon mustard powder
¼ teaspoon cayenne pepper or to taste
    Preheat the oven to 350ºF.

Place the chiles, cinnamon stick, cumin and coriander seeds, and the cloves on a small baking sheet in the preheated oven.  Roast, turning occasionally, for about 15 minutes or until nicely colored and very aromatic.
Remove from the oven and let cool slightly.
When cooled a bit, place in a spice grinder and process until smooth.  This can also be done using a mortar and pestle.
Combine the ground mixture with the sugar, salt, pepper, mustard powder, and cayenne in a small mixing bowl, stirring to blend well.
Store, tightly covered, in a cool spot for up to 3 months.
My other method for barbecuing ribs goes like this:
First you make a mixture of ½ cup each of cider or malt vinegar and brown sugar.  Season the ribs with salt and pepper and lay them on a double layer of heavy duty aluminum foil.  Pour the vinegar mixture over the top and wrap the foil over to tightly seal.  Grill them as above.
Then, unwrap and, using a pastry brush, generously coat the ribs with barbecue sauce – your own favorite or mine.  Return to the grill and grill, turning frequently, for about 20 minutes or until the edges are charred and the sauce has enveloped the meat.

My Favorite Barbecue Sauce
Makes about 6 cups
2 tablespoons corn oil
1 cup finely minced onion
3 cups ketchup
1 cup beer
¾ cup light brown sugar
¾ cup cider vinegar
3 tablespoons Worcestershire sauce
1 ½ tablespoons chili powder
1 tablespoon pure maple syrup
2 teaspoons mustard powder
Salt and pepper to taste
Tabasco® sauce to taste

Heat the oil in a large heavy saucepan over medium heat.  Add the onion and cook, stirring frequently, for about 5 minutes or until soft.
Add the ketchup, beer, brown sugar, vinegar, Worcestershire sauce, chili powder, maple syrup, and mustard powder, stirring to blend well.  Season with salt, pepper, and Tabasco® and bring to a simmer.  Cook at a bare simmer for about 40 minutes or until the flavors have blended.  Taste and, if necessary, adjust the seasoning.
Remove from the heat and set aside to cool.  When cool, store, tightly covered and refrigerated, for up to 1 month.

BBQ_Ribs

Read Full Post »

Older Posts »