Feeds:
Posts
Comments

Posts Tagged ‘beans’

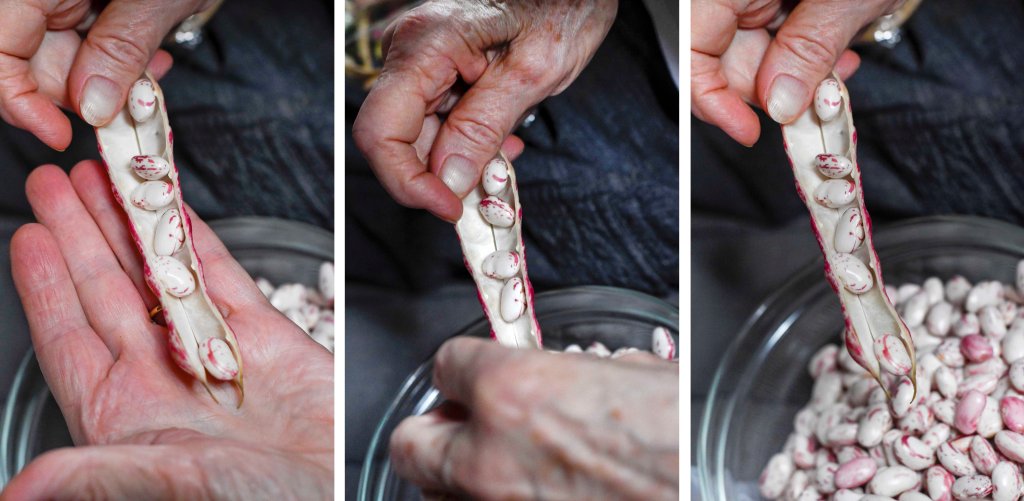
This recipe takes quite a bit of prep work as you neatly dice all the vegetables but the end result is well-worth the effort.  It is one of my favorite soups to make when fresh cannellini beans come to the green market.  This usually happens in the late summer or early fall.  I particularly enjoy the zen of sitting and shelling the beans.  If you have a rind of Parmesan cheese on hand, throw it in the pot.  It will add a lovely richness to the broth.

A version of this recipe will be found in my new book, The Mighty Bean, which will be published in February 2021.

Serves 6

¼ cup unsalted butter

2 tablespoons olive oil

1 cup diced onions

1 cup diced leeks

2 tablespoons minced flat leaf parsley

2 cups fresh cannellini beans

6 cups low-sodium vegetable broth

1 cup diced potatoes

1 cup diced carrots

1 cup diced celery

1 cup diced zucchini or yellow summer squash

1 cup diced green beans or yellow wax beans

1 cup fresh peas

1 cup chopped Savoy cabbage

2 cups diced Italian plum tomatoes with their juice

Salt and pepper

Extra virgin olive oil for serving, optional

Freshly grated Parmesan cheese for serving, optional

Combine butter and oil in a large soup pot over medium heat.  When hot, add the onions, leeks and parsley.  Lower the heat and cook, stirring frequently, for about 5 minutes or just until the aromatics begin to soften.

Stir in the cannellini beans and add 2 cups of the broth.  Cook for an additional 15 minutes.

Begin adding all the vegetables except the tomatoes, one at a time, and cooking each one for 3 minutes before adding the next one.  They should be added as they are listed in the ingredient list as this allows for the proper cooking time for each one.  

When all the vegetables have been added, stir in the tomatoes and remaining vegetable broth.  Season with salt and pepper, raise the heat and bring to a boil.

Immediately lower the heat to a bare simmer.  Simmer for about 30 minutes or until the soup is very thick.

Remove from the heat and serve with a sprinkle of grated Parmesan cheese and a drizzle of extra virgin olive oil, if desired.


Read Full Post »

Beans-on-Toast


My mom was a first generation American of Scots parentage so I grew up eating a cheap and cheerful dish called beans on toast that is everyday fare throughout the once United Kingdom.  The original is simply spoonfuls of Heinz baked beans (now known as Heinz Beanz) dumped on a slice of brown bread.  Of course, over the years, cooks have devised their own versions so beans on toast can now mean many things from plain to fancy.  To be tried and true you should use Heinz Beanz, but if you have a favorite brand of canned baked beans do not hesitate to use them.  There are no real amounts to be given, just pile on as many beans as you like.  Steve, my dearest husband, loves my version which stays pretty close to the original with a few exceptions which are:
I toast the bread.
I coat the toast with strong mustard.
I warm the beans and let some of the juices cook off so they aren’t quite so sloppy before I pile them onto the toast.
I cover the beans with cheddar cheese.
If I have it, a fry a couple of slices of thick bacon until almost crisp.
Preheat the oven to 400°F.
Then:  I pile the beans on the mustard-coated toast, top with a few slices of cheese, criss-cross the bacon on top and place the toast on a cookie sheet in the preheated oven.  I bake for about 5 minutes or until the cheese has melted and the bacon has crisped.  I serve it piping hot with mustard and crisp pickles on the side.  As the photo shows for this recent version no bacon was in the house.  I lie, I did have turkey bacon but that just didn’t seem to be right!

Read Full Post »

Garbanzo_4727


If you meander back to March 9th (2012) you will experience my thrill at the discovery of fresh garbanzo beans.  Once only a rare sighting, fresh garbanzos have become a summer staple at our local green market so they come to the table quite frequently these days.  They are a bit of a pain to get out of the shell, but I just zone out and take my time.  The other night I added them to fregola (that delicious Sardinian pasta that is rather like Israeli couscous) during its last few minutes of cooking just to cook the beans slightly.  I drained the pasta and tossed it with some caramelized onions and diced mushrooms that I had seasoned with orange zest, juice, sage, and olive oil.  I used the mixture as a base for some fatty, near-the-end-of-the-season fried soft shell crab.  I made a citrus brown butter to pour over the crab that also flavored the fregola.  It was quite a delicious meal if I do say so myself.

Read Full Post »

20130630_Fava_Beans_IMG_0262

If you’ve followed this blog through a summer or two, you know how much we like fresh fava beans.  I picked up a batch at the farmers market this other day, peeled them, and seasoned them with a little extra virgin olive oil, lemon zest, and salt and pepper.  Since the grill was already flaming, I put the mix in a cast iron skillet on the grill – it took just a few minutes to soften them a bit and allow the olive oil and lemon to add a little zest.  We piled them on a cracker with a thin slice of ricotta salata to enjoy with a pre-dinner glass of wine.  Easy, breezy and delicious.

20130706_Fava_Beans

20130706_Fava_Beans_IMG_0308

20130706_Fava_Beans_IMG_0328

Read Full Post »

DSC_9255

As you can tell, lately I’ve been on a Mexican food kick – burritos one night, mole the next, and then for breakfast a big plate of beans and eggs in the form of huevos rancheros.  As much as I love pico de gallo (the ubiquitous dip served with chips in every authentic or wanna-be Mexican or Tex-Mex restaurant), it is impossible to make at this time of the year ‘cause the tomatoes are so anemic and tasteless, so I try to make my own “authentic” Mexican cooked sauces to keep on hand when I need a south of the border fix.

To make the huevos, griddle up some corn tortillas (one for each serving and a couple for dipping and cleaning the plate).  Top with refried beans, then with 2 fried eggs, sunny-side-up, drizzle with tomato sauce, and serve as is or with a side of yellow rice.  On this morning, I grilled some of those sweet little peppers that come, pre-bagged, in a colorful mix that I found languishing in the back of the fridge to accent the plate as we were having friends join us.

Here’s my sauce:

1 pound ripe (ha!) tomatoes

Couple of chiles – jalapeño, Serrano or whatever is available, cut in half, lengthwise

3 cloves garlic

Cilantro or epazote to taste

Salt to taste

            Place the tomatoes, chiles, and garlic in a stovetop grill pan over medium heat.  Grill, turning occasionally, for about 15 minutes or until nicely charred and soft to the touch.  You might have to step away from the stove from time to time as the fumes from the cooking chiles can be powerful.

Remove from the grill and set aside until cool enough to handle.  When cool enough to handle, core the tomatoes, stem the chiles, and push the skin from the garlic.

Combine the tomatoes, chiles, and garlic in a food processor fitted with the metal blade.  Add the cilantro or epazote and season with salt.  Process, using quick on and off turns, to make a chunky sauce.

Scrape the sauce into a clean saucepan and place over medium heat.  Cook for about 5 minutes just to allow flavors to blend.  Taste and, if necessary, add more cilantro and salt.

Serve or transfer to a container and store, covered and refrigerated, for up to a week or so.

And here’s my refried beans: 

2-3 tablespoons bacon fat or lard (if you want to be good use canola oil, but why?)

Any amount of cooked beans you like – either pinto or black (with cooking liquid separately reserved if you have it) – I usually make about 4 cups

3 cloves garlic, minced or more if you like

3 sprigs epazote or cilantro or more if you like, finely chopped

1 jalapeño serrano chile, stemmed, seeded, and chopped

Salt to taste

Heat the fat in a large frying pan over medium heat.  Add the drained beans along with the garlic, herbs, and chile.  Cook, pushing down on the beans with a heatproof spatula or wooden spoon, until all of the beans have been mashed into the fat.  Lower the heat and season with salt.  Continue to cook, stirring frequently and adding reserved bean cooking liquid to keep the mixture moist, but not runny, for about 20 minutes or until the flavors are well blended and the mix is very flavorful.  Serve immediately or store, covered and refrigerated, for up to 1 week.

DSC_9268

Read Full Post »

Beans_7810

This is just a little blurb about beans just because I think everyone should be eating more of them.  I recently met with a group of people who run a hospital kitchen and was appalled to learn that none of them ever cooked dried beans – because, they said, they didn’t really like beans, you had to think too far in advance, and so forth.  Just in case you are in the same boat, here’s what you do to have a pot of beans ready to do anything you want with them.
No matter that many contemporary chefs say you don’t need to do so, I say you do have to soak beans for at least 8 hours in cold water to cover.  So, the night before you want to cook them, soak the beans.  Drain well, recover with cold water, and place over high heat.  Bring to a boil; then, lower the heat and continue to cook, adding water as necessary, for about 90 minutes or until tender.  I absolutely hate “al dente” beans which seem to be the current vogue in hipster restaurants.  You can do lots of other chores while the beans cook.
Once the beans are tender, you can do anything you want.  Just season them to your liking and serve up a plate of rice and beans, a world-wide nutritional meal.  Or, add tomatoes and basil and all things Italian – make a cassoulet – soups – hummus – chili – salads –dips – pastas – as a base for meats and poultry and on and on and on.  Well, I admit I once wrote a book called The Rediscovered Bean, so if you need a recipe, just let me know.

Read Full Post »