Feeds:
Posts
Comments

Posts Tagged ‘dinner ideas’

©Steve Pool Photography

          I don’t know when I first discovered pomegranates but it was sometime in my early teens.  I was hooked!  I loved their color, the piquancy of the arils, the messiness of pulling the fruit apart (I know, I know, there are some tidy methods of doing this but I like what I like!), the stains on my fingertips.  To this day, nothing can dissuade me from the thrill I feel when I first discover them arriving in the market…..usually long about now!  And the first thing I do is lean over my kitchen sink and begin pulling my purchase apart, almost slurping up the juicy arils as the colorful juice runs down my chin. 

          I rarely use them in cooking or baking — I just love pulling them apart and popping the arils – seeds, to me — between my teeth and feeling the juice explode on my tongue.  However, once in awhile I will patiently extract the arils and pile them up in a bowl to use in a salad, as a garnish or even in a stew.  Here is a salad in which they can shine.  It is perfect for fall.  It can stand on its own or be a side kick to almost any meat or game.

Wild Rice Salad

Serves 6

1 cup wild rice

Salt

½ cup low-fat plain yogurt

¼ cup hazelnut or walnut oil

¼ cup rice wine vinegar, preferably Japanese rice wine

½ teaspoon curry powder

¼ teaspoon minced ginger

1 cup julienned snow peas

¾ cup pomegranate arils plus more for garnishing if you like

½ cup julienned yellow bell pepper

½ cup chopped toasted hazelnuts

Pepper

          Rinse the wild rice and place in a bowl with cold water to cover for about 30 minutes or up to 1 hour.  Drain well and transfer to a medium saucepan.  Add 4 cups of cold water and season with salt.  Place over high heat and bring to a boil. 

          Lower the heat, cover and cook at a gentle simmer for about 45 minutes or until the rice is tender, but a bit chewy.  Remove from the heat and spoon into a colander.  Set aside to drain thoroughly.

          While the rice is cooking, prepare the dressing.

          Combine the yogurt with the hazelnut oil in a small mixing bowl.  Whisk in the vinegar.  When blended, whisk in the curry powder, and ginger.  Season with salt and pepper and set aside to allow the flavors to blend.

          When the rice is well drained, transfer to a serving bowl.  Toss in the snow peas, pomegranate, bell pepper and hazelnuts.  When well-blended, drizzle in the dressing, tossing to distribute evenly.

          Taste and, if necessary, season with salt and pepper. 

          Serve, as is, or with pomegranate sprinkled over the top or on a bed of greens.
Read Full Post »

©Steve Pool Photography

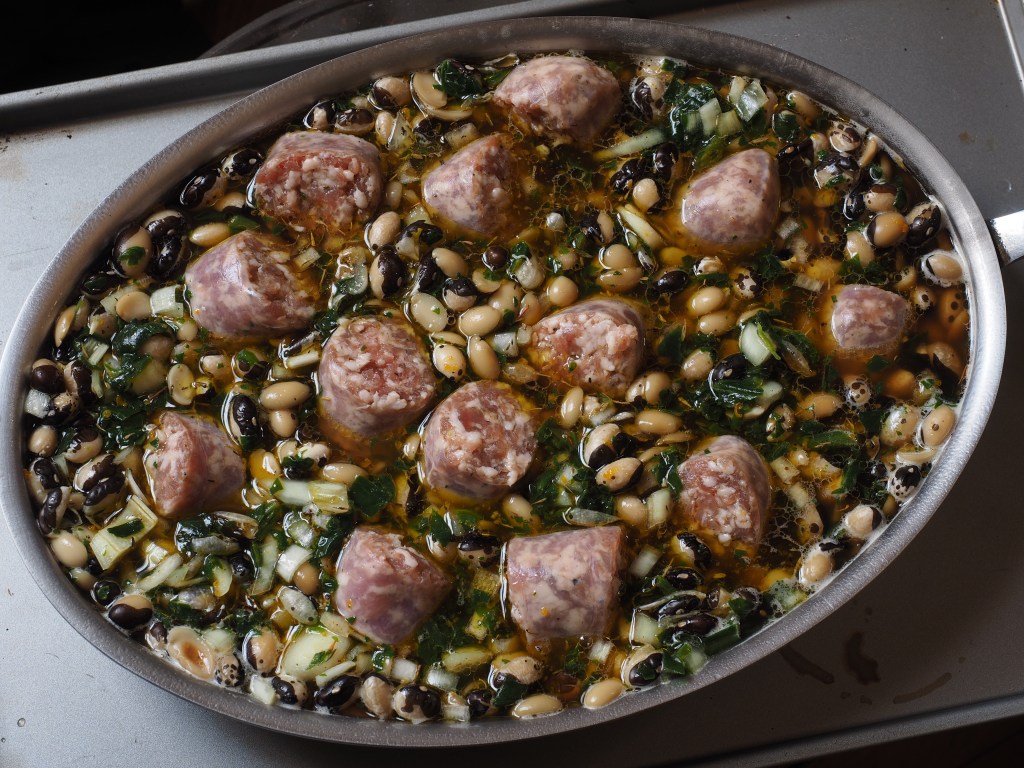
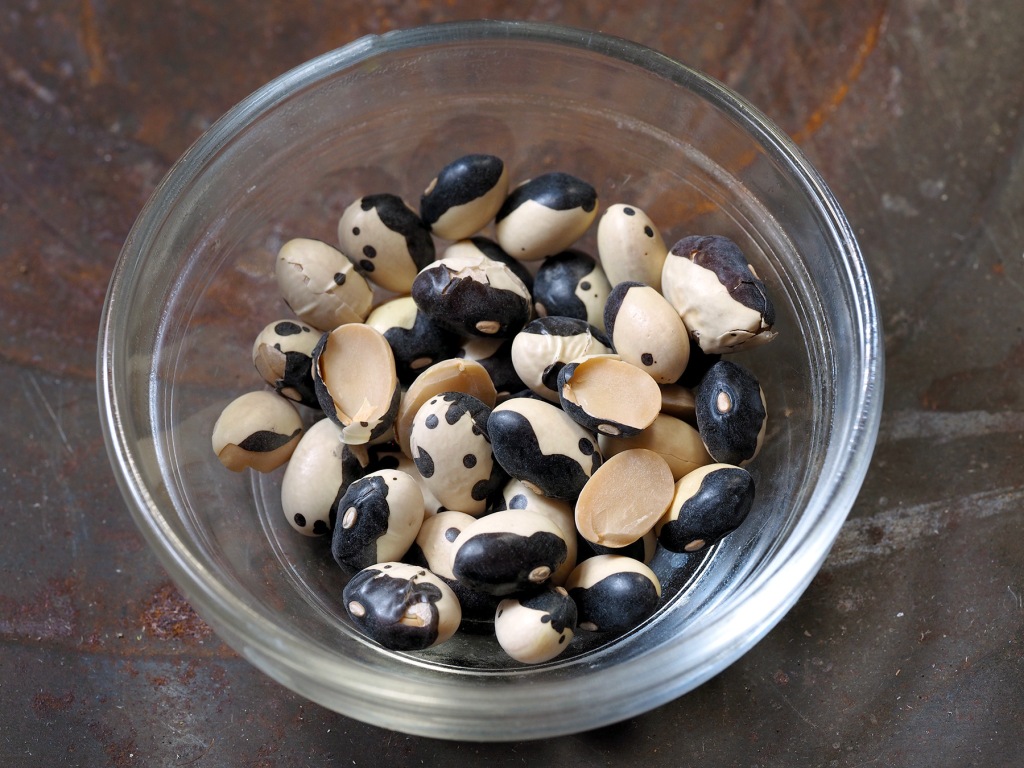
In this recipe, I used Yin-Yang beans which are also known as Black Calypso beans, but you can use any white bean you have on hand.  Yin-Yang beans are a kidney bean hybrid, native to the Americas.  Half white and half black, they are a beautiful bean which doubles in size when cooked.  You will find lots of great bean recipes in my forthcoming book, The Mighty Bean, which will be published in February 2021.  In the meantime, I’ll try to be better about posting recipes that will wet your whistle for the full monty that the book will offer.

One of the joys of writing about beans was the discovery of so many different types of beans.  And, once discovered, I found many new purveyors online that, even during this pandemic, could quickly deliver them to me.  Searching the internet for new types became quite a game for me and Steve loved photographing the new-found varieties.

          As fall settles in, you will begin to see dried beans at your local farmers markets.  I first found the now-lauded Rancho Gordo beans quite a few years ago at the San Francisco Ferry Market Saturday farmers market and made another California farmers market discovery of Kandarian Organic Farms beans at the San Rafael (California) Sunday farmers market.  And, here in New York I can find dried beans at a number of stalls at the various farmers markets around town or online all year round.

Serves 6

1 pound white beans, soaked for at least 8 hours

2 cups vegetable or chicken stock (or canned broth)

¼ cup white wine

2 tablespoons tomato paste

1 bunch Swiss chard, trimmed and chopped

1 onion, peeled and finely diced

1 teaspoon minced garlic

1 teaspoon freshly grated orange zest

1 teaspoon fresh thyme

Salt and pepper

1 pound sausage links, cut into pieces – Use any kind you like – sweet Italian, bratwurst, chorizo, blood sausage – all types work

Drain the soaked beans well.  Place them in a large pot with cold water to cover by at 2- to 3-inches.  Place over high heat and bring to a boil.  Immediately, lower the heat and cook at a gentle simmer for about 90 minutes or until the beans are just barely tender, but not mushy.  They are going to be cooked further so it is important that they are not over-cooked at this point.  Test for tenderness after about 45 minutes as the age of the bean will impact on the necessary cooking time – older beans take longer, freshly dried beans can often cook in less than an hour.  If you use a slow cooker or Instant Pot, follow whatever directions you normally use to cook dried beans.  I just stick to my old-fashioned ways!

Preheat the oven to 375°F.

Lightly grease a baking dish or casserole.  Set aside.

When the beans are almost tender, remove from the heat and drain well, reserving the cooking liquid.

Transfer the beans to a large mixing bowl.  Add the stock, wine and tomato paste, stirring to blend well.  Add the chopped chard, onion, garlic, orange zest and thyme.  Season with salt and pepper and again stir to blend.

Transfer the bean mixture to the prepared baking dish or casserole.  Nestle the sausage pieces into the beans and transfer to the preheated oven. 

Bake for about 45 minutes or until bubbling and crispy around the edges.

Remove from the oven and serve hot, with some crusty bread.

©Steve Pool Photography

Read Full Post »

My dear husband loves, loves, loves broccoli – I think he would happily eat it every day.  Because of this, I’m always trying to find interesting ways to cook it so we don’t have the same old roasted broccoli every day.  I never boil it as it was brought to the table in my childhood rendering it soggy and completely unappetizing.  

When last in San Francisco – in that other time when we could travel and visit far away places and eat anywhere that pleased us – we had a few wonderful meals at China Live (chinalivesf.com).  It is an amazing emporium and restaurant highlighting great Chinese products and foods.  We came home with some of their soy sauce, vinegar and chili oil – each one better than the other.  Once you try their soy sauce, it is very hard to go back to the supermarket choices.  The black vinegar is delicious and the chili oil incredible.  You can easily order all of these products online.

This is an easy and very tasty method of introducing broccoli into your menu IF you are not fond of it.  And, if you, like my husband, love it, this recipe will make you love it even more.  If you don’t have the China Live chili oil, use any Chinese chili oil you have on hand.

In case you don’t know this easy technique to mince garlic and ginger – just peel them and use a rasp grater to quickly grate.  Easy-peasy!  

Serves 4 to 6

1 head broccoli

½ cup plain yogurt

2 cloves garlic, peeled and minced

One ½-inch piece fresh ginger, peeled and minced

1 tablespoon lite soy sauce

1 teaspoon China Live chili oil

¼ teaspoon red chili flakes

Preheat the oven to 400°F.

Line a baking sheet with sides with parchment paper or nonstick aluminum foil.  Set aside.

Trim the broccoli, discarding the leaves and cut it into florets with some stem attached.  If the broccoli is older, check to make sure that the stems are not woody.  If they are, cut most of them off.

Combine the yogurt with the garlic, ginger, soy sauce, chili oil and chile flakes in a large mixing bowl, stirring to blend well.  Add the broccoli and toss to evenly coat.

Lay the seasoned broccoli out in a single layer on the prepared baking sheet.  Transfer to the preheated oven and roast, turning occasionally, for about 20 minutes or until the florets are lightly browned and the stems are tender.

Remove from the oven and serve.

Read Full Post »

OLYMPUS DIGITAL CAMERA

Eggplant Parm


Visiting our dear friends at their lake house I was designated the night’s cook.  I checked the fridge and found a couple of eggplant more than ready to be used.  At first I was just going to slice, bread and fry as my mom used to do – she insisted that fried eggplant tasted like fried oysters and who were we to argue – but then I remembered that I had brought a couple of jars of passata – that wonderfully rich Italian condensed tomato sauce so decided to look for enough other ingredients to make a version of eggplant parm.  However it was so hot, I didn’t want to turn the oven on so I thought why not give the grill a try……the eggplant would already to cooked and I would just need the heat to melted the cheese and give the flavors time to unite and give that delicious mixture of unctuous vegetable, rich sauce and melting cheese time to dance.

So, that’s what I did – I fried the eggplant, made a quick tomato sauce with the passata and fresh garlic and basil from the garden and sliced up a big hunk of mozzarella from the farmers market that I found in the cheese drawer of their well-stocked fridge.  Even found some pre-ground Parmesan to add that special sharp salty taste that gives that extra oomph to Italian dishes.  Put the mix together, heated up the grill, pulled the lid down and in less than a half flour we had a lovely almost Italian dinner on the deck.  Was my dish a classic – not really – but it sure was good.

Depending upon the amount of eggplant slices you have you can make a single layer, a double layer or even a triple layer of eggplant, cheese and sauce – always ending with a coating of sauce and a goodly amount of cheese to melt over it all.

You will also note that I don’t salt eggplant as many do – I’ve never found it necessary.  

By the way, just simply fried eggplant is a great easy dinner with the arugula on top and a bit of bread and cheese on the side.  And, you know what, the eggplant does kinda taste like friend oysters!

Just Plain Fried Eggplant

Serves 4 to 6 

2 large eggs

¼ cup milk

3 cups breadcrumbs (plain or seasoned, depending upon your preference)

½ cup Wondra flour

Sea salt and freshly ground pepper 

2 medium eggplants, trimmed and cut, crosswise, into slices about ⅜-inch thick 

About ½ cup olive oil for frying

Lemon quarters for drizzling

Preheat the oven to 350ºF.  


Combine the eggs and milk in a shallow dish, whisking to blend well.

Combine the breadcrumbs and flour in another shallow dish.  Season with salt and pepper to taste and stir to blend.

Working with one eggplant slice at a time, dip it into the egg mixture, allowing excess to drip off.  Then, dip it into the bread crumb mixture.  If you prefer a heavy coating, again dip into the egg and bread crumb mixture.  

Heat ¼ cup of the olive oil in a large frying pan over medium-high heat.  When very hot, but not smoking, begin adding the coated eggplant, without crowding the pan.  Fry, turning once, for about 3 to 4 minutes or until crisp and golden brown.  Transfer to a double layer of paper towel to drain.  If the oil gets too dark and filled with bits of the cooked coating, pour it out, wipe the pan clean with paper towel, and start again with fresh oil.

When all of the eggplant has been fried, transfer to a serving platter.  If you want to fancy it up, place a few handfuls of arugula in a mixing bowl and drizzle with olive oil and the juice of ½ lemon.  Season with salt and pepper and mound on top of the eggplant. Serve with lemon quarters for drizzling on the eggplant.

If you want to make Eggplant Parm, generously coat a baking dish with olive oil.  Coat the bottom of the dish with you favorite marinara sauce, followed by a layer of eggplant and then a thin layer of mozzarella cheese and continue making layers until you’ve made as many layers as you wish, ending with a coating of sauce and a layer of mozzarella.  You can sprinkle in Parmesan at any point including on the top of the final layer of mozzarella. Bake at 350°F for about 30 minutes or until hot, bubbling and the top layer of cheese is beginning to brown.

OLYMPUS DIGITAL CAMERA

Read Full Post »

OLYMPUS DIGITAL CAMERA

Chicken Thighs with Cabbage

Pantry cooking is in many ways, a luxury.  Although we think of it as money- and time-saving, a cook has to have the space, the budget and the hours to build a storehouse of ingredients that will make putting a meal on the table an easier task.  As COVID-19 has shut down my city as well as many other cities and towns across the world, pantry cooking has become the online talk-point of the moment.  Chefs and home cooks alike are featuring recipe videos telling us how to cook with what we have on hand.  It is almost overwhelming to be told constantly that there is nothing easier than cooking with what you have on hand.

I have to say that this is something I’ve been doing for most of my life.  There are a number of reasons for this.  My mother remembered the Great Depression only too well and was very careful with her food budget – she always had something on hand to create a tasty meal and leftovers were turned into another dish.  For years, because I lived in a lively neighborhood in NYC, I shopped daily from all of the extraordinary shops that lined the Avenues – butchers, bakers, produce markets.  I loved the thrill of deciding what our meals would be on these spur of the moment shopping forays.

Then, for some years we lived in a rural setting in upstate New York where the winters were long and harsh.  I learned to keep a stocked pantry if I intended to cook and bake as I always had.  Powdered milk, yeast, powdered buttermilk, canned goods, frozen meats were never out of reach so that I could bake bread and cakes, make tasty dinners and filling breakfasts every day.  And, when I returned to the city, I just kept the country ways.  I keep my kitchen pantry stocked so that I can entertain unexpected guests, feed my grandson on his lunch break or simply save myself daily shopping trips.  In addition, because I am more and more aware of people going hungry even in our richest cities I am increasingly careful about food waste.  Going back to my mother’s thriftiness, I recycle all leftovers and do my best to use what I have on hand before opening a new package, preparing a new vegetable or ordering a take-out meal.  

This recipe is a good example of cooking with what you have on hand.  If you don’t have shallots, use a small onion.  No garlic, omit it.  No chicken stock, use water.  No preserved lemon, use a fresh lemon – with this charge, the taste will change but, the dish will still be tasty.  And the only reason you seem some green is that I had a bunch of cilantro that was wilting fast so thought it would give a bit of freshness to the finished dish – certainly not necessary at all.

Chicken Thighs with Cabbage and Preserved Lemon

Serves 4

4 skinless bone-in chicken thighs

Wondra flour for dusting

Salt and pepper

1 tablespoon olive oil

½ large head cabbage, cored and shredded

1 large carrot, peeled and shredded

1 large shallot

1 large clove garlic, peeled and minced

1-½ cups chicken stock or low-sodium chicken broth

Juice and zest of 1 small orange

1 small preserved lemon, seeds removed and finely chopped

Trim off and discard any large pieces of fat from the chicken thighs.  Lightly coat each one with Wondra flour and season with salt and pepper.

Heat the oil in a large frying pan over medium heat.  When hot, add the coated thighs and cook for about 5 minutes, turning occasionally, until golden brown and beginning to cook through.

Remove the thighs from the pan and set aside.

Add the cabbage to the pan.  Toss in the carrot, shallot and garlic and cook, tossing occasionally, for about 5 minutes or just until the cabbage begins to wilt.  Season with salt and pepper, add the stock and orange juice and zest along with the preserved lemon and toss to blend well.

Nestle the thighs into the vegetable mix.  Cook, without stirring, for about 20 minutes or until the vegetable mixture is soft and mellow and the thighs are cooked through.

Remove from the heat and serve.

Read Full Post »

tromboncino-squash


One of the benefits of having a local big city green market – and, by the way, it is here through all of the seasons – is that the farmers get inspired by the chefs who shop with them and then us everyday folks get to taste the fruits of their mutual labors. All that to say that every once in awhile a “new” vegetable gets “discovered” and we reap the reward. One such discovery this past Sunday was tromboncino zucchini at Berried Treasures. Franca Tantillo whose farm in Cooks Falls, New York provides the market with her famous Tristar strawberries among other tasty items was singing the praises of this “discovery” and handing out pieces to lure buyers into the fold. I, of course, heard the siren call and succumbed to a few of these rather sensual looking squashes. Then, as I wandered back home through the hot streets I had to stop at Tarallucci e Vino to show Rita, my most favorite Italian-born barrista, my find. And, what did Rita say – “Oh, my mom grew tons of those in her garden back home – we got tired of eating them.” Call about getting your enthusiasm deflated!

Well, I took them home anyway and, as Rita suggested, I thinly sliced a couple and made a light, lemon-scented salad. Then I took the remaining 2 and turned them into quick pickles adding 2 little yellow zucchini I had on hand. Quick pickles are easy to do – just heat up equal parts white vinegar and water and season as you wish – lots of sugar and you have sweet pickles, more salt and a couple of tablespoons of sugar and you have everyday pickles – add chiles, onions, garlic, spices and you decide what your end result will be. Great to keep on hand all year round. I recommend that you only make a small batch ‘cause if you keep them too long they get soggy, mushy, and not something that is a joy to eat.


©StephenKolyer_zucchini

Read Full Post »

GrilledOctopus_4206


If you look back to some older posts (5/17/09  and 10/18/10 ) you will find some octopus history including how to poach and grill. This past weekend my buddy, Lynn, pulled a very large octopus from her freezer and after thawing it, I poached it and then we marinated it for the fellas to throw on the grill. It was quite delicious, but it was well over 5 pounds so there was a lot leftover. Lynn made a salad to take to a picnic and I offer the following recipe should you have the urge to grill a large octopus and then need something to do with the leftover meat.


1 pound red potatoes

Salt

1½ pounds cooked octopus, cut into pieces

1 small onion, peeled and diced

½ cup chopped olives, green or black

Juice of 1 lemon

¼ cup extra virgin olive oil

Pepper to taste

2 tablespoons chopped flat leaf parsley


Place the potatoes in a medium saucepan with cold salted water to cover over high heat. Bring to a boil. Lower the heat and simmer for about 15 minutes or until cooked through. Remove from the heat and drain well.

While still hot, cut the potatoes into chunks. Add the octopus, onion, and olives, tossing to blend well.

Combine the lemon juice with the olive oil, whisking to combine. Pour over the warm salad. Add the parsley and season with salt and pepper, again toss to blend.

Serve at room temperature.


Links to previous mentioned posts:

Octopus Salad

Octopus – A Current Favorite


Octopus©StephenKolyer

Read Full Post »

OLYMPUS DIGITAL CAMERA

Since there are just two of us when I roast a chicken I am faced with quite a lot of leftovers which translates to extra meals without a lot of cooking.  My first go-to is a chicken club sandwich – Steve, my dear husband is a lover of sandwich dinners.  At this time of the year the sandwich is not quite as delicious as it is in the summer with ripe juicy tomatoes on hand, but I chop up some of those sweet Sun Gold cherry tomatoes and they do the job quite nicely.

Even after making our sandwiches, there is still meat on the bones so I put the meaty carcass in a pot with cold water, onion, carrot, celery stalk (if I have it), herbs, and any leftover chicken stock or “jus” I have and simmer up a rich, chickeny broth.  I strain it, discarding everything but any meat floating about and the carcass.  I pull off the meat left on the bones and make a soup that will be dinner one night and a couple of lunches during the week.  For this particular broth, I added some diced carrots and onions along with a bag of chopped organic kale that was lurking in the freezer and some terrific Italian pasta from a brand called Rummo, a family-owned company in Campagna, Italy.  The pasta is what made the soup – it is extremely flavorful and stays al dente so you get that wonderful chewiness that great dried pasta reflects.  I was introduced to this brand by Rita, one of my favorite Italian baristas.  Although I haven’t seen this brand in many stores, Rita purchases it somewhere uptown in Manhattan.  I went on line and checked its availability and found an old review from New York Magazine where 3 NYC chefs rated it extremely low.  I can only assume that the company has changed its process because there is no way I’d rate it at the bottom of a list of dried pastas.  I find it has great flavor and cooks to the perfect “al dente” texture.


chicken-soup_p4206688

Read Full Post »

Dean Leg of Lamb 1


This time it’s not an Aussie but a Kiwi who is introducing us to a favorite dish from down under. We had our Easter celebration with our dear friends Daniella (Australia), Stuart (Australia via England), and Dean (New Zealand). Daniella supplied a copious amount of delicious wines and Dean and Stuart prepared a glorious late lunch. I feel very spoiled when I visit as I get to sit up on a stool at their kitchen counter and sip a glass of wine as I watch them do all the work. The dinner was lovely with two stand-outs, Dean’s leg of lamb and Stuart’s pavlova. I asked Dean how he prepared the lamb and this is what he told me:


“I made a paste of garlic, rosemary, olive oil and a whole jar of anchovies packed in oil. I scored the leg and massaged in the paste and then wrapped it in plastic film for 24 hrs. I roasted it on high heat on a roasting rack for about 1¾ hours. I added some homemade stock (made with lamb shank bones and chicken necks) to the roasting pan along with a bottle of sancerre. I let the liquid reduce down to make the sauce”.


The lamb was superbly roasted and the sauce was divine. See how lucky we are to have bought Oz into our lives!

Read Full Post »

vegetable-chili


Everybody seems to have a favorite chili recipe, but I generally just wing it.  I do from time to time stick to my mom’s method (see a post from November 13, 2012) but as often as not I do some type of vegetarian chili.  Since the weather had cooled and I had a mess of cooked red beans on hand, I decided it was going to be easy to put dinner together.  I sautéed a big chopped onion and a few minced cloves of garlic in a little canola oil.  I added a large can of plum tomatoes (that I had squished), a medium can of tomato puree, a couple of dollops of tomato paste along with 4 chopped carrots, 2 chopped zucchini, 1 chopped red bell pepper, 1 minced jalapeño, and some mushrooms that were needing to be cooked.  To be honest the additions were based solely on what I had on hand.  Seasoned the mix with a good amount of seasoned chili powder, ground cumin, oregano, and red pepper flakes and, of course, salt and pepper.  Had I had some winter squash or sweet potatoes on hand I would have added either of those also.   I added the cooking liquid from the beans and then let the vegetable mix cook for a while before adding the cooked beans as they were already pretty soft and didn’t really need much more cooking.  I baked some corn muffins, quickly tossed a green salad, and Eh! Voila! dinner was on the table and we had lunch ready to go to our besties at Loupe Digital.

Read Full Post »

Older Posts »